Are you putting
together a PowerPoint presentation? Here are just five tips, tricks and
techniques for turning your slides into something amazing.
1. Use Infographics
Infographics combine text and images in a smart, visually engaging way.
You won't have to worry about striking the right balance between words
and pictures when you combine them in one nifty format.
2. Play With Colors
You don't want to overdo it, of course, but it's perfectly acceptable to
line your slides with a colored border or emphasize important titles in
red. A few splashes from the rainbow will keep your audience alert and
focused on your presentation.
3. Use Keyword Shortcuts
Not only will they save you time, energy and effort, but they'll also
look impressive in front of your audience when you're able to call up
your slideshow with nothing more than Shift+F5.
4. Keep It Simple
Try not to offer more than one point, fact or statistic per slide. If
you give a lot of information at once, your audience will be too busy
reading it all to listen to your lecture.
5. Resist Transitions
Transitions are a sign of juvenile presenters. They may look cool in the
middle of the night when you're working from your laptop, but in the
cold light of day, surrounded by shareholders in business suits, they'll
just seem silly.
These are five tips for maximizing the effectiveness of your PowerPoint
presentation. For even more assistance, contact professional PowerPoint
developers like the ones at eSlide.com.
Welcome To Your Geek Corner! Blog about tools, software, technology, web apps, gadgets, computer and internet tips and tricks! Helpful tips and info for you to make the best of your web experience.
Showing posts with label Software Tutorials. Show all posts
Showing posts with label Software Tutorials. Show all posts
Friday, October 3, 2014
Wednesday, June 13, 2012
Internet Explorer 9 Showing A Blank Page
I've encountered a problem with Internet Explorer 9 some days ago that really bothered me. Since I work with blogs I always open RSS pages on IE to save the files to my computer to get affiliate content to some of my blogs. All of a sudden all I could get from IE9 was a blank page, no matter what site I tried to visualize. The page looked like this:
Let's say it was quite frustrating... When I was about to give up on IE9 I decided to at least look that up on some search engines to see if anyone else had gone through the same situation and for my surprise (and relief) this problem seems to be quite common and easy to fix. It turns out that IE9's core feature is hardware rendering, so using IE9 without it is useless. So I decided to share the solution here for anyone else that is going through the same situation with IE9.
To fix this problem, disable hardware rendering:
1. Click on Tools, select Internet Options
2. Go to the Advanced tab, and tick "Use software rendering instead of GPU rendering"
3. Press Apply and OK and restart IE9 and done. (in my case it turned back to normal immediately without any need to restart IE9 but maybe you might need to restart it to see results)
Ps.: This may prevent some programs (like Adobe installers) from working. These programs use the rendering engine of IE, but forces Hardware Rendering. To fix this, you'll have to downgrade to IE8.
Wednesday, April 4, 2012
How To Change Color Of The Windows 7 Basic Theme For Old Computers And Laptops
Although Windows 7 comes with the "Aero theme" enabled by default, it still includes the "Classic Theme" that was the default theme in Windows 2000, and was still available in Windows XP and Windows Vista. The Classic Theme has a major advantage over Aero for underpowered laptops, desktops and netbooks.
Mine is an example, yesterday it came from repair with the windows 7 ultimate installed but despite of my computer being a fast computer with a lot of RAM memory, the video card memory is no big thing, so using Aero is out of question.
Well, I had to stick with the basic theme then but that pale blue was getting me sick, so it was time to find a way to change that ugly color and I did. Since I googled the problem and noticed lots of people struggling with this same problem I am going to explain with details how I changed the Windows 7 Basic Theme color of my computer.
It’s not complicated, if you pay attention you will see that is actually a piece of cake… so let’s get started:
First of all you have to download the UniversalThemePatcher that can be found here.
You can operate in normal mode. Do not need to enter safe mode.
Choose the corresponding patcher based on you Windows:
* For 32bit (x86): UniversalThemePatcher-x86.exe
* For 64bit (amd64): UniversalThemePatcher-x64.exe
Require administrator rights. You right-click the exe file and select Run as Administrator. Once you execute the exe file 3 files need to be patched on Windows 7 and these files are: uxtheme.dll, themeui.dll, themeservice.dll.
After patch, Restart computer for changes to take effect.
With the computer on now it’s the time to change the color and for this you need to change the aero.msstyle file that is found on C:\Windows\Resources\Themes\Aero. For that you need to “Take Ownership” of the file. Download and install TakeOwnership for context menu.
After that you go to C:\Windows\Resources\Themes\Aero right click with the mouse and click Take Ownership, now you Copy ONE of the aero.msstyles that you find in the folder of the themes you download and replace the old aero.msstyles with the new one. Don’t forget to make a back up copy of the old aero.msstyles in case you want to get back to the default color in the future.
Now you just need to reboot and enjoy!
In my case I chose the basic black and it looks like this:
Ps.: I found some theme colors and will share them with you:
1. Windows7 Build 7068 Basic Blue
2. Windows 7 Basic Black
3. Windows 7 Basic Black Theme
4. Windows 7 Basic Modified Color (Mega color pack)
Monday, March 19, 2012
How To Get Rid Of The Windows Disk Verification Blue Screen
You already tried to leave the verification to go till the end but still every time you turn on the computer Windows asks to verify the disks? if the answer is yes, then start Windows normally and then click Start » Run, type regedit.exe, navigate through the registry keys like shown in the picture below:
HKEY_LOCAL_MACHINE\SYSTEM\CurrentControlSet\Contro l\Session Manager
Locate the BootExecute key (REG_MULTI_SZ) and see if the value is assigned autocheck autochk *
If it is empty it and RESTART Windows normally.
HKEY_LOCAL_MACHINE\SYSTEM\CurrentControlSet\Contro l\Session Manager
Locate the BootExecute key (REG_MULTI_SZ) and see if the value is assigned autocheck autochk *
If it is empty it and RESTART Windows normally.
Sunday, February 12, 2012
Mozilla Add-Ons
Everybody wants to have fast loading blogs or websites, that´s for sure. We know that widgets, badges, graphics and scripts slow down the website performance (pitty cause I simply love them).
Here I have two add-ons for mozilla firefox browser that will help you discover what is slowing down your page and help you fix that.
Yslow is an add-on that analyzes web pages and tells you why they're slow based on Yahoo's rules for high performance web sites. It can be downloaded here.
After downloading Yslow you will also need the firebug that helps you monitor CSS, HTML, and JavaScript live in any web page.
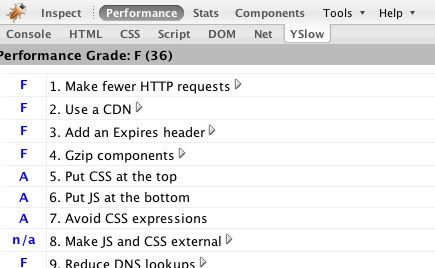
Ok, after done dowloading it´s time to add them to firefox. After adding the browser will ask to be restarted. Than now you have them on firefox, so change the settings and open your website. You will see the Yslow Icon on the status bar. Click on it then it will look like on this picture:

Click on the Performance button and wait, the add-on will test all components of your webpage and than show the grade.
If your performance grade appears to be 25 than your website is ok. If not You can see what is making it slow and it will show you how to improve it.
Here I have two add-ons for mozilla firefox browser that will help you discover what is slowing down your page and help you fix that.
Yslow is an add-on that analyzes web pages and tells you why they're slow based on Yahoo's rules for high performance web sites. It can be downloaded here.
After downloading Yslow you will also need the firebug that helps you monitor CSS, HTML, and JavaScript live in any web page.
Ok, after done dowloading it´s time to add them to firefox. After adding the browser will ask to be restarted. Than now you have them on firefox, so change the settings and open your website. You will see the Yslow Icon on the status bar. Click on it then it will look like on this picture:

Click on the Performance button and wait, the add-on will test all components of your webpage and than show the grade.
If your performance grade appears to be 25 than your website is ok. If not You can see what is making it slow and it will show you how to improve it.
Photoshop Tutorial On Transparent Background On Pictures
Ok, so you want to put a picture on your website but in a way that is not intrusive to your layout by creating a transparent background. Let’s get started then!
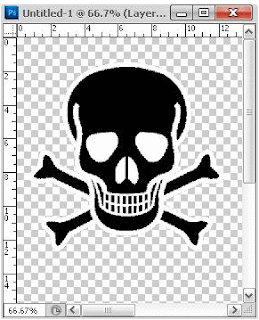
First open the picture on your photoshop and use the Magic Wand Tool to select the image. If necessary, zoom in on the image so you can clearly see the edges like on the picture below.
Then after the image you want to use with the transparent background is selected use the Control+C command to copy then picture. Go to the menu File then click New; Now choose on Background Contents - Transparent. Now use the Control+V command to paste the image you selected to the new picture. It will look like this:
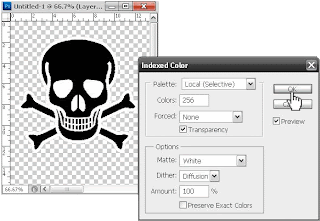
Now go to the menu File and click on Save As… and save as a .Gif, a box will appear and you will choose the options like the image below:
Click in OK and it’s done. Now you have a picture with transparent background that you can use in any background color without being intrusive!
Saturday, February 11, 2012
Ougos - Your Online Traffic Broker!
This tip goes for the newbies out there that are struggling to get traffic to their brand new sites or blogs, but also to any webmaster that needs more traffic to their website. Let's talk about Ougos...
Ougos is an Online Traffic Broker! You can receive free “clicks” and “impressions” on your website. With the OUGO Browser it is possible to visit up to 720 sites per hour. Also you can run the OUGO Browser in the background, so it doesn't disturb you while surfing.
Ougos is different to normal visitor’s exchange service. Normal visitor’s exchange services offer their members to receive clicks on their websites too, but these clicks are “forced” (Forced-Clicks) and cost many credits. Ougos doesn’t force its members to click on a special button at member’s website to earn more credits. Ougos offers real and unforced clicks. And it is still very efficient! You receive more clicks on your website with Ougos than with Forced4Click campaigns in visitor’s exchange services!
Here a list of the advantages of using Ougos:
1. You get impressions and clicks. Traffic exchange programs only offer impressions.
2. Ougos users are invisible. No one knows that your visitors come from Ougos.
3. Determine where your visitors comes from.
4. Determine how often the same visitor may visit your website per day.
5. The OUGO Browser is the surfbar. The Ougo you can run in the background and will not disturb you while surfing!
All you have to do is click the banner above and sign up and the tutorial on the Ougos site will teach you step by step how to set up the browser and start getting visitors on your site immediately!
Subscribe to:
Posts (Atom)


